Want to start adding yoga exercises to your daily routine, but feel a bit too intimidated to jump into a class of seemingly normal people moonlighting as acrobats? We’ve got your back. (Literally.)
Below are 11 yoga exercises for beginners that work for anyone who is:
A) interested in trying a new at-home routine.
B) looking for a little tutorial before they try their first class.
C) in need of an energy boost, better posture, a little exercise, or a quick way to calm.
D) all about the yoga benefits, not the bullshit.
In other words, everyone could use a little yoga flow, especially if you don’t need to leave your space to do it. Let’s get started.
The Benefits and Challenges of Yoga Exercises
Before rolling out your yoga mat and getting your moves on, let’s clear the air—yoga isn’t an easy practice, no matter what Instagram says. I’m a certified yoga instructor now, but my first class? I cried. I felt things I had never felt before, both in my mind and my body. It takes time to become comfortable in the poses and to connect your breath and movements. And it also takes time to become comfortable with your own thoughts. Just remember: If you’re feeling a certain kind of way before, during, or after your go at yoga, it’s totally okay. We’ve all been there.
While yoga can be challenging and frustrating, it can also be beautiful. (Yup, we said it, but stay with us.) If you keep at it and keep trying, you’ll quickly notice the benefits. What are those benefits? I’m so glad you asked.
By incorporating yoga exercises into your routine, you may:
- improve your flexibility and balance.
- relieve your lower back pain.
- lower your blood pressure.
- increase your focus.
- enhance your sleep.
- boost your body satisfaction.
Just to be clear—the research is spotty and hasn’t proven these benefits in the long term. That doesn’t mean that yoga isn’t beneficial for our bodies or our brains; it just means that the research hasn’t caught up with us.
Yoga Exercises That Work for Everyone…Even You
Let’s get going with these 11 yoga exercises. Roll out your mat, grab a towel, and start to inhale the good shit and exhale the rest of it. Ready, set, om.
1. Easy Pose

This is often the first position in a yoga class, and therefore, one of the best yoga exercises we’re going to teach you. It looks like how you used to sit in kindergarten, but there’s so much more to this simple, yet difficult pose. This pose helps you to become centered on your mat, feel the space around you, and connect you to…well, you.
Here’s how to do it:
- Come to a cross-legged seat at the center of your mat. Begin to inhale for 1…2…3… and exhale for 1…2…3.
- Straighten your spine and feel the top of your head become closer to the sky.
- Lift your shoulders to your ears and then ease them down your back.
- Close your eyes and place the palms of your hands on your knees.
- Begin to inhale for 1…2…3… and exhale for 1…2…3.
2. Table Pose
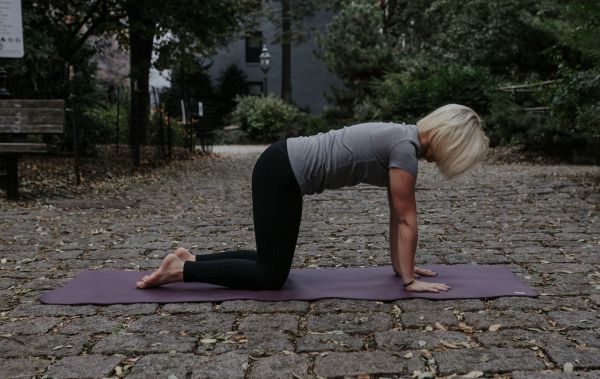
If you’re trying yoga because you need a little stability in your life, this is just the pose to practice. From table pose, you will easily be able to move through poses like cat, cow, and sunbird. Some benefits of this pose include strengthening the low back, decreasing lower back pain, and creating stability in joints.
Here’s how to do it:
- Place your hands and your knees on the mat.
- Be sure your hands and wrists are in line with your shoulders and that your knees are directly underneath your hands.
- Press the tops of your feet into the mat and feel your legs begin to activate.
- Feel the spine begin to lengthen, from your tailbone to the top of your head.
- Close your eyes, breathe, and begin to notice yourself stabilizing.
3. Plank Pose

Plank is a very tough pose, but the more you practice it, the stronger your mind, your body, and all of your other poses will be. We’re not talking plank challenges here either. Start off holding the pose for a short period of time beginning with 10 seconds then moving to 30 seconds, 45 seconds, and finally 60 seconds. If you notice your form breaking at any point (looking at you, saggy hips), take a break.
Benefits of this pose include developing postural stability, preventing shoulder injuries, and improving overall fitness levels.
Here’s how to do it:
- Begin in table pose (see above) and just observe your alignment.
- Spread your fingers wide and begin to rotate your biceps toward the front of your mat. Your elbow will face toward the front of your mat.
- Keep a soft gaze toward the ground.
- Stretch your left leg long; stretch your right leg long.
- Press your heels toward the back of the mat, the crown of your head toward the front of the mat, and feel your spine begin to lengthen.
4. Mountain Pose

One of my teachers once said, “The way you stand in mountain pose is the way you stand in life.” He was absolutely right. This is one of the foundational poses of yoga. Once you master this, you can master it all. Benefits include improving posture and expanding the lungs for better breathing.
Here’s how to do it:
- Stand at the top of your mat with your feet parallel and hip-width apart.
- Lift the kneecaps to activate your quadriceps and feel your muscles wrap around your bones.
- Lift your ribcage up evenly from all four sides and feel it align over your pelvis, over your hips.
- Straighten your spine and feel the top of your head become closer to the sky…okay, or the ceiling.
- Widen the shoulders and feel your chest begin to open more fully.
5. Downward Facing Dog Pose
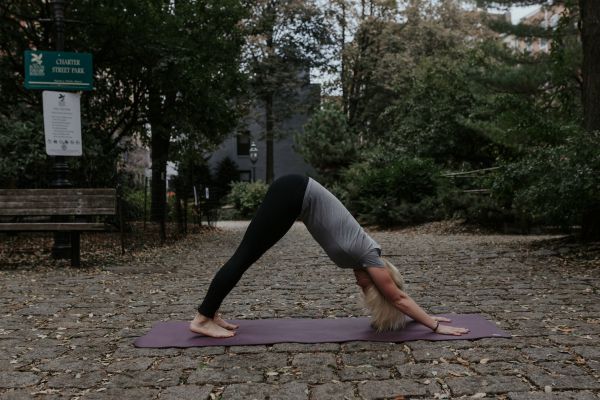
When you hear the word “yoga,” a snapshot of this pose likely pops into your mind. It’s a super fun place to just hang out—well, for some of us. Benefits of this pose include creating symmetry between the upper and lower body, strengthening the upper and lower body, and inducing calm.
Here’s how to do it:
- Begin in table pose (see above) and begin to walk your hands closer toward the front of your mat.
- Spread your fingers wide and begin to rotate your biceps toward the front of your mat. Your elbow will face toward the front of your mat.
- Curl your toes underneath your feet and bring your hips up toward the sky, keeping your knees slightly bent.
- Stretch through your legs and peddle your right foot, then your left foot. Press the heels toward the ground.
- Feel a lengthening sensation through your arms, through your spine, and through your legs.
- Close your eyes, stay, breathe, swear. (Only if you need to though.)
6. Sphinx Pose

Sphinx is my all-time favorite backbend pose. It’s a great warm-up to some more advanced poses like cobra and upward-facing dog. Benefits of this pose include assisting in alignment, strengthening your lower trapezius muscle (in your shoulder), and creating length in your spine.
Here’s how to do it:
- Lay on your stomach with your arms stretched up overhead.
- Bend your elbows and draw them back underneath your shoulders.
- Place your forearms parallel and shoulder width apart.
- Spread your fingers wide and ease your shoulders down your back.
- Press your chest toward the front of you, feel your chest muscles open, and soften your lower back.
- Stay, breathe, and feel.
7. Warrior 1 Pose
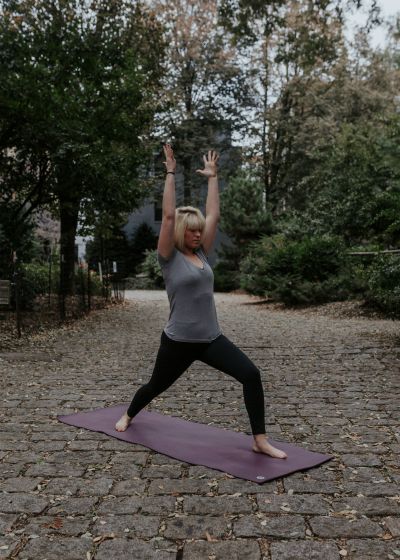
So I’m going to be honest here—some yoga exercises are a little bit more advanced, like this one, but you can totally handle it. If you’re interested in trying a class, you’ll likely have to move into this position. If might feel challenging at first so remember to keep breathing. Benefits of this pose include developing flexibility in the hips, strengthening your core, and opening your chest.
Here’s how to do it:
- Begin standing with your feet wide. Your right toes will point toward the front of the mat. Lift your left foot, place it at the back of the mat with your toes pointed at a 45-degree angle.
- Draw the right hip back and the left hip forward. Square those hips toward the front of your mat. (I always like to put my hands on my hips to feel them square off.)
- Slowly lift your arms up overhead, biceps in line with your ears.
- Continue to bend your right knee over your right ankle and continue to reach those fingertips up toward the sky.
- Inhale and exhale, with that gaze right in front of you.
- Slowly come out of it and take it to the other side.
8. Warrior 2 Pose

There are certain yoga exercises that just make you feel like a badass. This is one of them. Benefits of Warrior 2 include strengthening the body, aligning the body, and increasing your ability to stay calm.
Here’s how to do it:
- Begin standing with your feet wide. Your right toes will point toward the front of the mat. Lift your left foot, place it at the back of the mat with your toes pointed toward the left side of your mat. Be sure the left arch is in line with your right heel.
- Lift your arms up to shoulder height with your right fingertips pointing toward the front of your mat and the left fingertips pointing toward the back of your mat.
- Relax your shoulders as if you were just hanging out on a couch somewhere.
- Continue to bend your right knee over your right ankle.
- Activate your left leg and keep that foot firm on the ground.
- Gaze toward your right fingertips, continue to inhale and exhale.
- Slowly come out of it and take it to the other side.
9. Tree Pose

Do you have a favorite tree? If that’s not a weird question, and even if it is, picture that tree when you’re in this pose. In tree pose, stand tall and stay connected to the ground (essential so you don’t fall over). Benefits of this pose include strengthening the legs and creating balance.
Here’s how to do it:
- Begin in mountain pose (see above).
- Bend the right knee and bring the sole of your right foot to your inner calf or inner thigh (depending on today’s balance and flexibility).
- Press the sole of your foot and your inner calf or inner thigh together.
- Bring your hands into prayer position at the center of your chest. If you feel your balance is strong, begin to lengthen those arms out into a T position and then up overhead.
- Stay, breathe, balance, and slowly come back down to mountain pose.
- Take it to the other side.
10. Bridge Pose
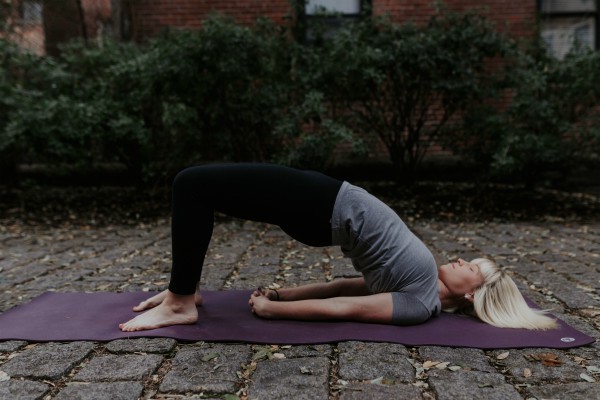
Back bend away, all. Bridge is a great way to learn how to effectively and safely go into a backbend. After you master this, you can move on to the funky wheel pose, an all-time favorite in yoga photoshoots. Benefits of this pose include strengthening the back and stretching out the hips.
Here’s how to do it:
- Lay on your back, with the soles of your feet on the mat, your knees pointed toward the ceiling, and your arms down long. Be sure your feet are hip-width apart.
- As you inhale, tuck your chin into your chest, press into your feet, and lift your hips up toward the sky.
- As you exhale, shimmy your shoulders underneath and clasp your hands directly under your hips.
- Keep inhaling and exhaling, watching your chest rise and fall, and watching your hips do the same.
- Exhale, slowly release your spine back down to the mat, one vertebra at a time.
11. Corpse Pose
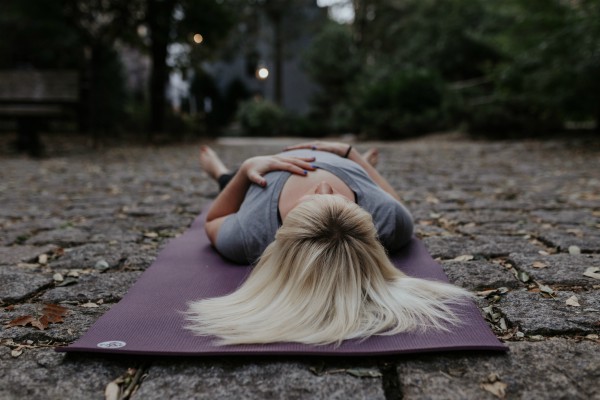
Yes, you even should be practicing your napping position. Just kidding—unfortunately, corpse pose (i.e. savasana) is not a nap. Savasana is a moment at the end of your practice to come back to your breath, come back to your body, and feel the energy that you created…or the sweat you just released. Benefits of this pose include lowering blood pressure and calming the mind.
Here’s how to do it:
- Lay on your back, with the soles of the feet on the mat and your knees pointed toward the ceiling.
- Lengthen your legs out long allowing your feet to fall into their natural place.
- Lengthen your arms out long with your palms facing upwards.
- Soften your eyes, soften your body, and begin to melt into the mat.
- Rest, relax, rejuvenate.
Now that you’ve completed your at-home stretch sesh, how do you feel? We hope these yoga exercises left you a little calmer, a little rejuvenated, and maybe even intrigued enough to give yoga another go. Take a big deep breath and get on with your day. You earned it.
Your turn: What’s your favorite way to stretch out and find your calm? Share in the comments below and stick around for more easy routines for better days.
Disclaimer: This tutorial is not intended to replace medical advice. Check with your doctor before starting a new exercise program and obtain full medical clearance before practicing yoga. Please follow proper warm-up and cool-down procedures before and after attempting the poses in this post. Positive Routines is not liable for any injury sustained while trying these exercises.
Author: Bailey Reagan
Bailey is a community builder and positive psychology educator on a mission to help others design a life they give a damn about. She holds a Master’s of Applied Positive Psychology from the University of Pennsylvania and a Certificate in Applied Positive Psychology from The Flourishing Center. She’s still trying to figure out how these degrees will land her a gig as Macklemore’s back up dancer.

 Danielle Reyes says
November 28, 2017 at 6:12 pmLove this!
 Positive Routines says
November 29, 2017 at 10:04 amThanks, Danielle! We’re big fans too.